What I did in this project is quite simple but a little out of the box. In this project I have all those regular graphical tasks like rotation, lightning, projection etc. But the main thing I did is to build a communication between DirectX, the platform I’ve used, and other graphics libraries and 3D modeling software.
This is a well discussed and pretty advanced way of DirectX. I’ve just studied on it and found some way to implement. Nothing new I’ve proposed here, but learned a lot.
I’ve worked on popular DirectX file format – .x and rendered the graphics information from .x to the screen.
I’ve used Microsoft Visual C# as programming language.
I’ve become interested about this .x file format while I was thinking of modeling my bedroom in 3D. That seemed to me like an amazing project, but it was a bit complex and large scale. Then I found this bridge between renowned 3D modeling software and DirectX. It’s possible to make a 3D model of almost anything using those software (e.g. 3D Studio Max, Maya, Poser etc.) and then I can export that model in DirectX format.
Most of the 3D modeling software supports this format. For 3D Studio Max I’ve used “PandaDXExport” plug-in.
I’d like to leave the discussion about the modeling process of 3D Studio Max or Maya to their own tutorials or documents. When I’ve been able to export the model in .x format, it’s now my job to extract the information from the file and display on screen.
First we need to know the format of X File.
Well, it’s not as hard like the unsolved case of FBI in the TV serial – X Files. It’s not even related. The .x file format is pretty simple. Some tag based information storing system. It is template-driven file format and is used by Direct3D Retained Mode to describe geometry data, frame hierarchies, and animations. In short, we store all information of a Mesh in an .x file.
Each file is lead by a header which contains the file format (e.g. text or binary), float length etc.
Then the templates are defined. Templates define how the data stream is interpreted—the data is modulated by the template definition.
Then data is defined. Data objects contain the actual data or a reference to that data. Each has a corresponding template that specifies the data type.
For more detail about .x file format, following website can be a good resource:
- http://local.wasp.uwa.edu.au/~pbourke/dataformats/directx/
Mesh can hold all the Material and Texture information you need to draw an object. As an example, we could again put our whole 3D city into one mesh, have it optimized and displayed.
While loading a file that stores Mesh, it would be too complex to call individual function for individual type of object. So I’ve built a generic Mesh loading function where the file name is passed as argument.
LoadMesh(string file_path, string file_name)
Then I have loaded the Mesh file using the LoadMesh() function of Direct3D.
this.m_Mesh = Mesh.FromFile(file_name, MeshFlags.Managed, m_Device, out exmaterials)
Then I have extracted the material and texture information in separate arrays with the following code:
for (int i = 0; i < exmaterials.Length; i++)
{
  string texture_file = exmaterials[i].TextureFilename;
  if (texture_file != null)
  {
    if (texture_file.Length > 0)
    {
      try
      {
        m_Textures[i] = TextureLoader.FromFile(m_Device, file_path + texture_file);
      }
      catch
      {
        MessageBox.Show("Error loading texture " + texture_file, "Error");
      }
    }
  }
  this.m_Materials[i] = exmaterials[i].Material3D;
  this.m_Materials[i].Ambient = m_Materials[i].Diffuse;
}
After this point I have all the material and texture information.
Now I have to draw the 3D object with the information I have in my hand. For this purpose, I have initialized the graphics earlier with the InitializeGraphics() function.
public bool InitializeGraphics()
{
  PresentParameters parms = new PresentParameters();
  parms.Windowed = true;
  parms.SwapEffect = SwapEffect.Discard;
  parms.EnableAutoDepthStencil = true; // Depth stencil on.
  parms.AutoDepthStencilFormat = DepthFormat.D16;
  try
  {
    this.m_Device = new Device(0, DeviceType.Hardware, this.viewPort,
    CreateFlags.SoftwareVertexProcessing, parms);
  }
  catch
  {
    MessageBox.Show("Hardware initialization failed", "Exception");
  }
  // Turn on D3D lighting.
  m_Device.RenderState.Lighting = true;
  // Turn on the Z-buffer.
  m_Device.RenderState.ZBufferEnable = true;
  // Cull triangles that are oriented counter clockwise.
  m_Device.RenderState.CullMode = Cull.CounterClockwise;
  // Make points bigger so they're easy to see.
  m_Device.RenderState.PointSize = 4;
  // Start in solid mode.
  m_Device.RenderState.FillMode = FillMode.Solid;
  // Make the lights.
  SetupLights();
  return true;
}
Then in the paint function, first I have to setup the world and view matrixes, setup the camera and the lights. I have done this inside the function: SetupMatrices().
Inside the function, I have checked the user’s input and determined the rotation axes, camera position etc. The function definition of SetupMatrices() is like this:
private void SetupMatrices()
{
  // World Matrix:
  const int TICKS_PER_REV = 10000;
  double angle = Environment.TickCount * (2 * Math.PI) / TICKS_PER_REV;
  switch (this.rotationAxes)
  {
    case 1: //X Axes
      this.m_Device.Transform.World = Matrix.RotationX((float)angle);
    break;
    case 2: //Y Axes
      this.m_Device.Transform.World = Matrix.RotationY((float)angle);
    break;
    case 3: //Z Axes
      this.m_Device.Transform.World = Matrix.RotationZ((float)angle);
    break;
  }
  // View Matrix:
  Vector3 camera_position = new Vector3(this.camXPos, this.camYPos, -20);
  camera_position.Normalize();
  camera_position.Multiply(this.m_Range);
  this.m_Device.Transform.View = Matrix.LookAtLH(
    camera_position,
    new Vector3(0, 0, 0),
    new Vector3(0, 1, 0));
  // Projection Matrix:
  this.m_Device.Transform.Projection =
  Matrix.PerspectiveFovLH((float)(Math.PI / 4), 1, 1, 100);
}
And finally when all the setups are done, I draw all the Mesh and subsets from the .x file.
// Draw the mesh's subsets.
for (int i = 0; i < this.m_NumSubSets; i++)
{
  this.m_Device.Material = m_Materials[i];
  this.m_Device.SetTexture(0, m_Textures[i]);
  this.m_Mesh.DrawSubset(i);
}
That’s all except for the last line inside the OnPaint() function.
this.Invalidate();
This line refreshes the viewport on each tick and displays the new object position.
That described the flow of my work – how I have processed the .x file and printed the 3D Mesh on the screen.
Except the above codes, I have some user input handling methods. I have handled input for zoom in/out, moving the camera about X axes and Y axes, changing the .X File on the go etc.
The project loads .X file and renders it perfectly. Only has some problem with animation template. There has to be some more complex handling. I could not do it here but wish to. I had developed a sample animation in 3D Studio Max and added the exported .X file (Truck.x) in the project. But it does not load properly.
I had the plan to develop a 3D model of my bedroom and display it, but could not finish processing all those images to develop a 3D view. As a sample I have added a 3D view of a lobby which I found on the internet.
The .X files I have used here are from Microsoft’s ® sample file and from internet. Some are exported from 3D Studio Max.
Methods Used
public displayX()
The constructor. This initializes the form.
public bool InitializeGraphics()
Initializes graphics variables.
public void LoadMesh(string file_path, string file_name)
Loads the Mesh from file (.x file).
protected override void OnPaint(System.Windows.Forms.PaintEventArgs e)
The paint method. Renders the object on viewport.
private void SetupMatrices()
Sets up the matrices required for 3D rendering.
private void SetupLights()
Sets up the lights.
private void InitializeComponent()
Initializes the form components like buttons, combo boxes etc.
private void FillMode_CheckedChanged(object sender, EventArgs e)
Method handles the change of fill mode. Three options are available – filled, wire frame and point.
private void zoomIn_Click(object sender, EventArgs e)
Handles the zoom in operation.
private void zoomOut_Click(object sender, EventArgs e)
Handles the zoom out operation.
private void xPlusButton_Click(object sender, EventArgs e)
Moves camera to the positive X axes.
private void xMinusButton_Click(object sender, EventArgs e)
Moves camera to the negative X axes.
private void yPlusButton_Click(object sender, EventArgs e)
Moves camera to the positive Y axes.
private void yMinusButton_Click(object sender, EventArgs e)
Moves camera to the negative Y axes.
private void XFile_SelectedIndexChanged(object sender, EventArgs e)
Handles the change of selected .x file and loads the new Mesh from file on the go.
private void dispalyX_Load(object sender, EventArgs e)
This method is called on the form load. This lists all the available .x files and populates the combo box.
private void xButton_Click(object sender, EventArgs e)
Changes the rotation axes according to the X axes.
private void yButton_Click(object sender, EventArgs e)
Changes the rotation axes according to the Y axes.
private void zButton_Click(object sender, EventArgs e)
Changes the rotation axes according to the Z axes.
The Code
There are several files and a lot of code in them. Most are for initializing the forms and UI development. All the codes and project files are available inside the download archive. The main code file required to render Mesh from external .X file is display.cs file. Code is commented for better understanding.
Usage
Here is a small video to show how the application is used.
External Resources Used
Plug-in to export .x from 3D Studio Max
- PandaDXExport4.6.62.0
- Downloaded from Pandasoft (http://www.andytather.co.uk/Panda/directxmax.aspx).
References
- Riemer’s XMA Tutorial
- DirectX Format
- MSDN Forum
- DirectX Resources and Documentation
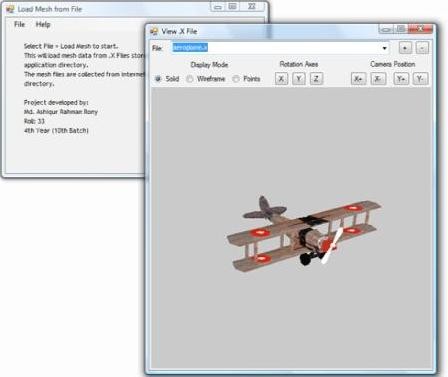
Screen Shot

Displaying the airplane model from .x file
Downloads
Download code and project files here.


Leave a Reply